1.1 - Install
For the successful installation, your web server must have the following:
- Your PHP version must be greater or equal to 5.6
- You must install the PHP ZipArchive Extension
- You must install the PHP Xml Extension
- Your website database must be UTF-8 encoding
- Your CMS must be using UTF-8 encoding
Follow these steps to install Your Spreadsheet Calculator:
- Check if your Wordpress website has proper permissions/ownership of folders and files. For more information click here
- Install WooCommerce: Read the instructions how to install it here
- Download the latest version of the Your Spreadsheet Calculator plugin by clicking here
- Go to "Plugins > Add new" in your WP-admin website
- Click on "Upload Plugin" then click on "Browse..." and select the file you've just downloaded
- After the plugin has been installed, click on "Activate" and the calculator will be installed successfully
- Check if you have proper permissions/ownership of the folders and files inside "/wp-content/plugins/excel-worksheet-price-calculation"
- Check if you have disabled the WP_DEBUG by setting
define( 'WP_DEBUG', false );in your "/wp-config.php" (more information available here)
Notes:
- Your Spreadsheet Calculator is compatible with PHP 8.
- Some plug-in were already verified as compatible or incompatible with Your Spreadsheet Calculator.
- In case the following warning message is displayed "it does not test it with current version of wooCommerce”, it can happen 2 things:
- Some functionality problems are generated because of some necessary updates of our plug-in.
- No problems are generated because our plugin is still compatible with the new version of Woommerce. So, ignore the warning message.
1.2 - Update
Warning: No data should be lost during the process, but it's a good practice to take a backup of your data.
Update from your WP-admin
- Download the latest version of Your Spreadsheet Calculator from your download area
- From your WP-admin website click on "Plugins"
- Look for "YourPlugins Spreadsheet Calculator"
- Click on "Deactivate"
- Click on "Delete"
- Click on "Add new"
- Click on "Upload Plugin" then click on "Browse..." and select the downloaded file
- After the plugin has been installed, click on "Activate"
Update via FTP
- Download the latest version of Your Spreadsheet Calculator from your download area
- Extract the ZIP file on your PC
- Overwrite all the files by FTP in: "/wp-content/plugins/excel-worksheet-price-calculation"
1.4 - Install bugfix
“Nothing in this software world is bug-free” … Our plugin could contain some bugs too. In this case, we can send you a pre-release version just to correct your problems.
Warning: no data should be lost during the process but it's always a good practice to take a backup of your data
You can download a betafix version in the download area.
To install a bugfix release on Wordpress follow these steps:
Using Wordpress Plugin Manager:
- Download the ZIP file from the URL we provided you and save it on your PC
- On your Wordpress back-end, click on "Plugins", search for "YourPlugins Spreadsheet Calculator" and click on "Deactivate"
- Remove it by clicking on "Delete"
- Upload the ZIP file which you downloaded in step 1, by clicking on "Add new"
- After the plugin has been installed click on "Activate"
- Download the ZIP file from the URL we provided you and extract the ZIP file on your PC
- On your Wordpress back-end click on "Plugins", search for "YourPlugins Spreadsheet Calculator" and click on "Deactivate"
- Delete the plugin folder "/wp-content/plugins/excel-worksheet-price-calculation" by FTP
- Upload the folder "excel-worksheet-price-calculation" by FTP in: "/wp-content/plugins"
- Remember to give files proper permissions
- On your Wordpress back-end click on "Plugins", search for "YourPlugins Spreadsheet Calculator" then click on "Active"
1.5 - Access the plugin
To access the plugin click on “WooCommerce”, and then click on “YourPlugins Spreadsheet Calculator”.

1.6 - How to create fields
Prior to creating the calculator which will be used on the product's page, the fields that will be used by the visitor to calculate a final price must be created.
You can create two kinds of fields on Your Spreadsheet Calculator:
- Input Fields: The visitors will use these kinds of fields to input values. For example, you can use these fields to request the visitor to input Height and Width
- Output Fields: The visitors will see the result in these kinds of fields. You don't need to create the output field "Price" because it's the default output field. For example, you can use the output field(s) to show the Weight calculated to the user by using Height and Width he previously entered.
To create a new field:
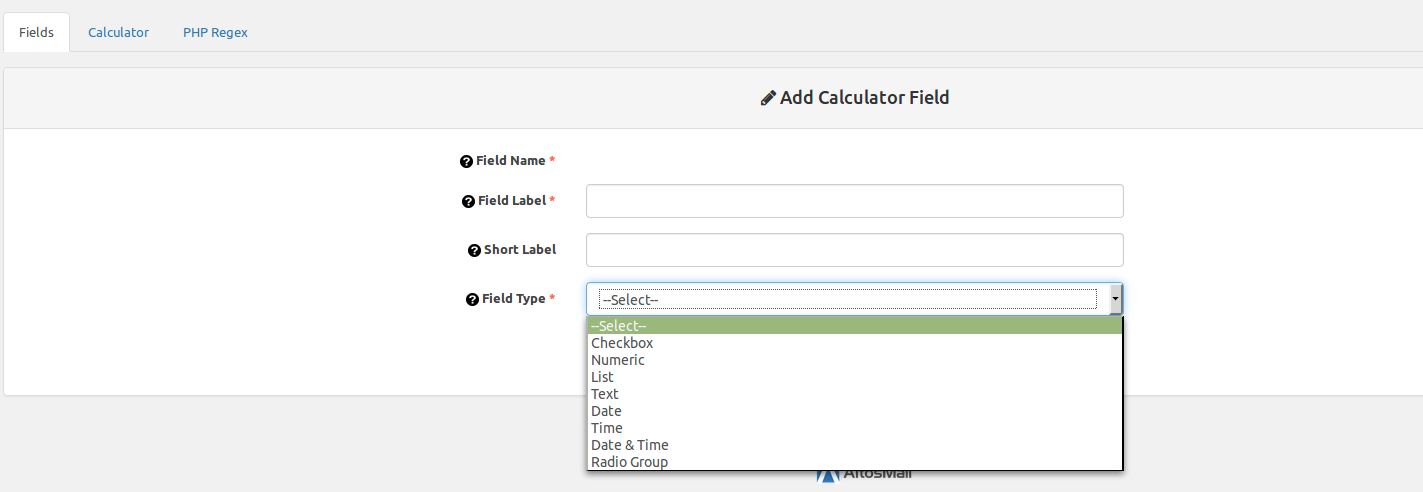
- Click on the "Fields" tab
- Click on "New Field", which will show you the field options. Input and Output fields could have different field options (See below).
- Insert the information relative to the field type chosen. See the Field Types chapter for more info.
- Click on "Save"
The following field options are the same both for Input and Output fields:
- Field Name *: This is a read-only field. it's a unique identifier of your field which you can use inside your formulas and your themes as well.
- Field Label *: This is the label that the field should have. The field will be shown in the product's folder, named with this label.
- Short label: It's not mandatory, but you can write a short label for the field that will be shown in the cart. if empty the "Field Label" is used as default label.
- Description: You can write a description here to help you remember what the field does.
- Field Mode *: You can choose to create an input or an output field
- Hide on cart if empty: If "Yes", it will hide the field on the cart if the field is empty (No value)
- Hide on checkout if empty: If "Yes", it will hide the field on the checkout if the field is empty (No value)
- Hide field on cart: If "Yes", it will hide the field on the cart
- Hide field on checkout: If "Yes", it will hide the field on the checkout
- Hide field on order: If "Yes", it will hide the field on the order
* means required field.
These are field options specific for Input fields:
- Field Type *: The field type. See the Field Types chapter for more info.
- Required: If "Yes" the visitor is required to put a value in the field (Also "0" is considered an empty value). If the field is empty, the error message "Required Error Message" will be shown to the visitor. If "Required Error Message" is not set, then a default error message will be shown.
- Text after field: You can display some text by typing in this field. The text will be displayed right after the field.
- Check Errors: If "Always", field errors are validated in Product Page, on Cart and on Add to cart. If "On cart and on Add to Cart", field errors are only validated on Cart and on Add to cart.
* means required field.
These are field options specific for Output fields:
Output fields can contain numbers or strings.
- Hide field on product page: If "Yes", it will hide the field on the product page
- Number of Decimals [Default is 2]: If the output is a number, it will be formatted with the number of decimals typed in
- Thousand Separator: If the output is a number, it will be formatted with the thousand separator typed in
- Decimal Separator [Default is . ]If the output is a number, it will be formatted with the decimal separator typed in
* means required field.
Created fields could be used for different calculators. A field can be used by more calculators, therefore creating the same fields multiple times, such as "height" and "width", is not necessary.
The "Search" field can be used to find a field with certain characteristics.
In the "Actions" column you can:
- Edit: Change the field options.
- Clone: Duplicate the field, this will let you create a new field with the same options.
- Delete: Delete the field. Please pay attention, because this action is not reversible.
Notes:
- The plugin doesn't limit the number of fields you can create
1.6.1 - More on Output Fields
Output Fields allow you to display extra information for your visitors. The information is got from your Excel file and can be numeric (ex. discounts, taxes, additional fees) or text (ex. "You get a discount of 20%"). This information can be fixed or dynamic if you use excel formulas to calculate it.
In order to create an Output Field, if you have already created a calculator (if you didn't already please follow the instructions here):
- Hover the mouse on WooCommerce and click on Your Spreadsheet Calculator
- Click on the Fields tab
- Click on the New Field button
- Give your field a name by typing it in Field Label and change Field Mode as Output
- Save your field by clicking on Save
Secondly, add your Output Field to your calculator:
- Click on the Calculator tab
- Click on Edit of your calculator
-
From the Output Fields list click on your desired output field. You should move your field from the left to the right in order to add it to your calculator:
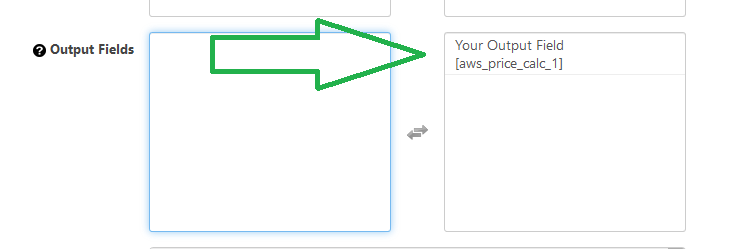
- Click on Save to save the calculator
Lastly, map your Output Field to your Excel cell:
- Click on the Calculator tab
-
Click on the dropdown of your calculator and click on Edit Mapping:

-
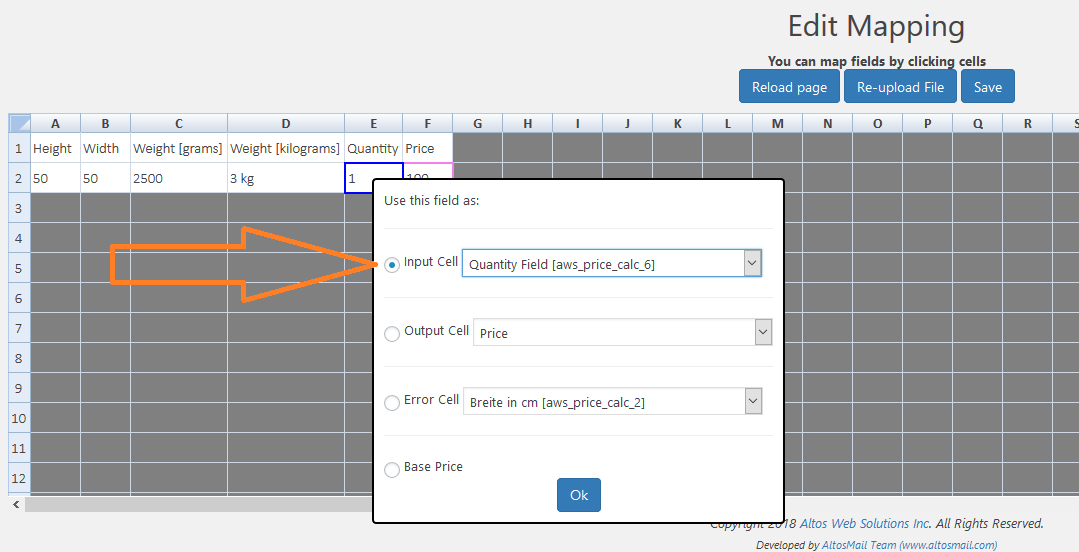
Map the field by clicking on your desired cell then click on the option Output Cell and select your output field from the list:
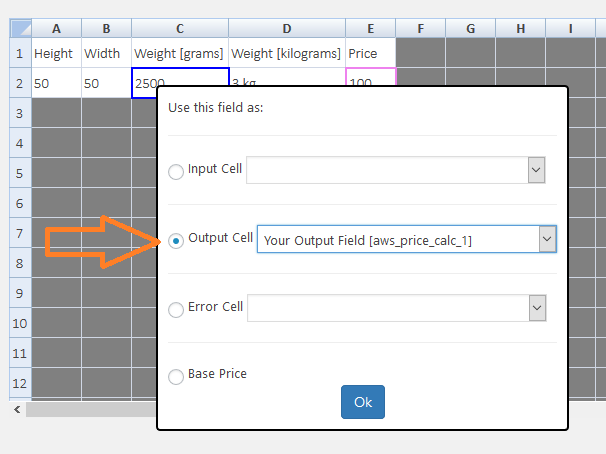
- Click on Ok button
- Click on Save to save your calculator.
If you need more information on every output field property, please check here.
1.6.2 - Field Types
Your Spreadsheet Calculator field types can be:
- Checkbox: A checkbox is shown, meaning the visitor can only choose between two values
- Numeric: The visitor can place a numeric value, both whole or with decimals
- List: The visitor can choose a value from a predetermined list. Warning: Your Spreadsheet Calculator doesn't support default Excel drop-down feature, so you should create the list manually using the "field list" inside the plugin.
- Text: The visitor can type in any sequence of characters in the desired font
- Date: The visitor can choose a date from the calendar
- Time: The visitor can choose a time from the calendar
- Date & Time: The visitor can choose the date and the time from the calendar
- Radio Group: Allows to place a group of choices "Radio Button" style
- Image List [Added from version 2.2.0]: Your customer can select an Image from a popup list of Images.
- Upload [Added from version 2.3.2]: An upload field gives the visitor the possibility to upload one or more files of different types. The memory limit is inherited from the one specified by the system itself or Wordpress settings.
Important: All these fields have some further specifications and details mentioned below. Please have a look and it will help you understand and use them in a better way.
In the case of a Checkbox it's possible to set:
- Default Status: If set to "Unchecked", the checkbox will be empty. Otherwise, it will have the check.
- Checked Value: The value that will be used by the calculator when the visitor checks the checkbox
- Unchecked Value: The value that will be sued by the calculator when the visitor leaves the checkbox unchecked
In the case of a Numeric type it's possible to set:
- Default Value: The value seen by the visitor when the page is opened. This parameter is also used to calculate the default price in the WooCommerce Shop Page.
- Maximum Value: The maximum numeric value allowed. Beyond this, an error message warning that the Maximum value has been reached will be displayed
- Maximum Value Error Message: Error seen if the Maximum Value is surpassed
- Minimum Value: The minimum numeric value allowed. Below this, an error message warning that the Minimum value has been reached will be displayed
- Minimum Value Error Message: Error seen if the Minimum Value is breached
- Number of Decimals: Number of decimals that the visitor can use. The default number of decimals is 2
- Decimal Separator: Decimal separator used in a numeric value. The default decimal separator is set to "."
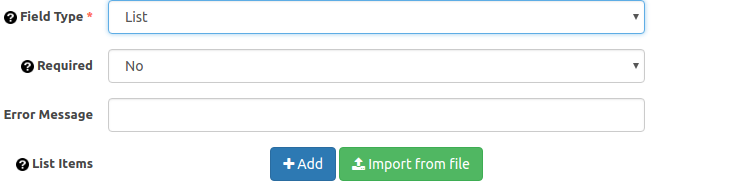
In case of a List or Radio Group, it's possible to set the items that will be shown. Click on "Add" to add new items, or click on "x" to remove them from the list. An item can be edited by clicking on the "pen" icon, while the order in which they should be displayed can be changed by simply "dragging & dropping" them.
it's possible to set for each item:
- Label: The label of the item.
- Value: The value of the item. It can only be a numeric value.
- Default Option: Set an option which you want to show your customers as default selected value
- Order details: You can add additional information inside the customer order (WooCommerce Order) by writing in this field.
Using Radio Group you can also set an Image for each radio item.
In the case of a Text type, it's possible to set:
- Default Value: The value seen by the visitor when the page is opened. This parameter is also used to calculate the default price in the WooCommerce Shop Page.
- Validation Regex Rule: Regex rules are a powerful validation tool. A Regex rule can be used to validate a field; for example, if an email address has been typed in and so on, a rule can be set to check if all the letters placed are either capital letters or not.
- Regex Error Message: If the Regex rule is not respected, the error message placed here will be displayed
In case of an Image List field, you can add a new image by clicking on "Add". The following options let you:
- Image Field Width: Change the width of the image displayed on the product page.
- Image Field Height: Change the height of the image displayed on the product page.
- Image Popup Width: Change the width of the list of images displayed in the popup window.
- Image Popup Height: Change the height of the list of images displayed in the popup window.
In case of Date, Time, Date Time, the following options let you:
- Default Value: If "Empty" the date/time field will be empty. If "Spreadsheet Value" is selected, Your Spreadsheet Calculator gets the value from the Input Field mapped in your Spreadsheet. This way you can use formulas like "TODAY()" to get the actual date or time.
- Format: Change the date/time format
1.6.3 - Upload list items by spreadsheet file
This feature is available starting from version 2.3.0
Using this feature you can upload multiple items in List, Radio Group and Image List fields from a spreadsheet file without adding each item manually.
Upload your spreadsheet file
To upload your spreadsheet file in order to add items for input fields like List, Radio Group and Image List, you have to go the way you create a normal field. Inside the specified fields, the button Import from file let you upload the spreadsheet of the calculator in xls, xlsx or ods format.
The basic structure of the spreadsheet file
The structure of the file should be specified as below:
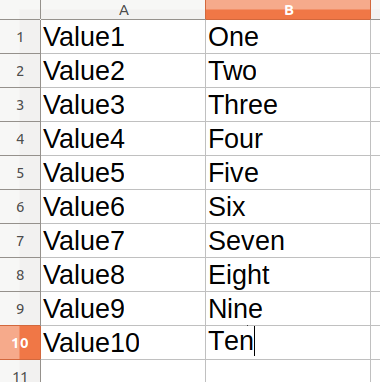
- In column A, Value1 => is the string label to be shown to the customer.
- In column B, One => is the value used by the plugin to do the calculation in the background.
Important note: data must start at the first row and first column, otherwise the plug-in would not be able to get the data from the spreadsheet file.
The file structure could be different if you want to import items on List field, Radio Group field or Image List field:
Spreadsheet structure for List field
An item of a list input field can contain up to 4 attributes and should be placed in the spreadsheet file in this manner:
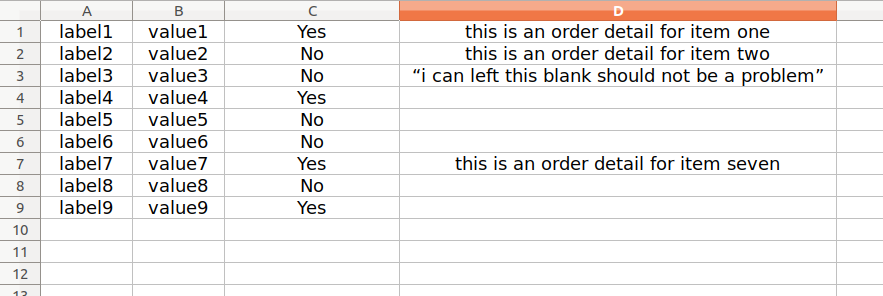
- Column C: It must contain the "Default Option" attribute, as shown in the picture it can take only the string ‘Yes’ or ‘No’ everything else would not take effect. It can be left blank.
- Column D: It must contain the Order Detail, this attribute can contain every type of data. Its purpose is to give more information to the user on the product page for the selected option. It can be left blank as well.
Spreadsheet structure for Radio Group
An item of a radio-group input field can contain up to 7 attributes and should be placed in the spreadsheet file in this manner:

- Column C: It must contain the "Default Option" attribute, as shown in the picture it can take only the string ‘Yes’ or ‘No’ everything else would not take effect. It can be left blank as well.
- Column D: It must contain the "Order Detail", this attribute can contain every type of data. Its purpose is to give more information to the user on the product page for the selected option. It can be left blank as well.
- Column E: It must contain the label position related to the radio button. It can take only two values ‘right’ or ‘left’ everything else would not take effect. It can be left blank as well.
- Column F: It must contain the pop-up message for the purpose of additional information for the user on the product page. It can be left blank as well.
- Column G: It must take the path of the image to be associated with the radio button. The path must be absolute. It can be left blank as well.
Spreadsheet structure for Image List
An item of a radio-group input field can contain up to 5 attribute and should be placed in the spreadsheet file in this manner:
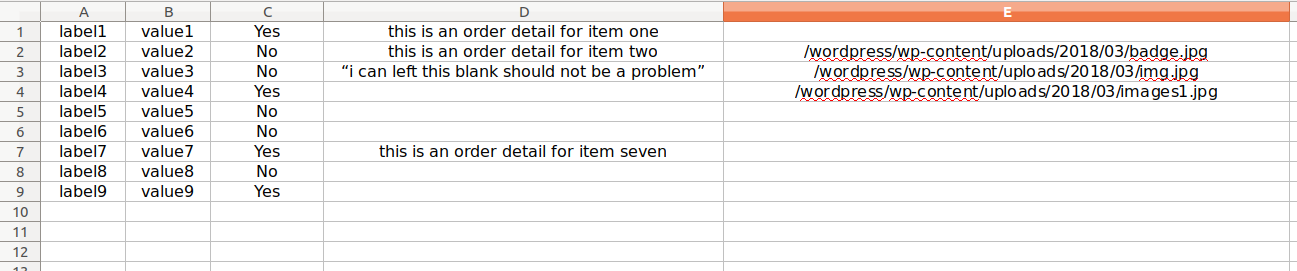
- Column C: It must contain the "Default Option" attribute, as shown in the picture it can take only the string ‘Yes’ or ‘No’ everything else would not take effect. It can be left blank.
- Column D: It must contain the "Order Detail", this attribute can contain every type of data. Its purpose is to give more information to the user on the product page for the related options to select. It can be left blank.
- Column E: It must take the path of the image to be associated with the radio button. The path must be absolute. Be careful it is a mandatory column.
Upload page
Below is a screenshot how the upload form will look like:

After you have chosen the file click Import button. If the file structure is correct you will show the next page:

Here you can see created items and you can change the items as well. After that click the Save button.
1.6.4 - How to Overwrite Quantity Field
If your Excel file contains formulas based on Quantity then it's very likely you need to overwrite the WooCommerce Quantity Field. This feature is also compatible with the WooCommerce Stock Management feature.
Two main things will happen:
- The default WooCommerce Quantity Field will be hidden.
- A selected Your Spreadsheet Calculator Input Field will be shown instead.
You can overwrite the WooCommerce Quantity Field very easily, by following these steps:
- You need to create a calculator by follow the instructions here.
- Create a normal Input Field which will be used as a Quantity Field by following the instructions here
- From WooCommerce > Your Spreadsheet Calculator click on the Calculator tab
- Select your calculator by clicking on Edit
-
From Input Fields click on your quantity field to move it on the right:
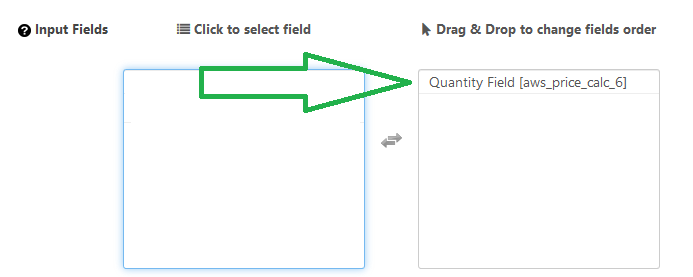
- Change the Overwrite Quantity property from No to your quantity field.
- Click on Save in order to save your calculator.
If you don't need to map your quantity field or if you have already mapped it, you can skip this step, otherwise:
- Click on the Calculator tab
-
Click on the dropdown of your calculator and click on Edit Mapping
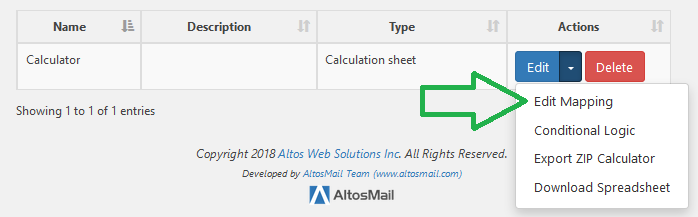
-
Map your quantity field by clicking on your desired cell then click on the option Input Cell and select your field from the list:
- Click on the Ok button
- Click on Save to save the mapping.
1.7 - Creating a calculator from a mathematical formula
You can use Your Spreadsheet Calculator for creating a calculator using simple mathematical formulas. For more complex formulas and features, you can load a spreadsheet file directly (Pro version).
First of all you need to create your WooCommerce Product:
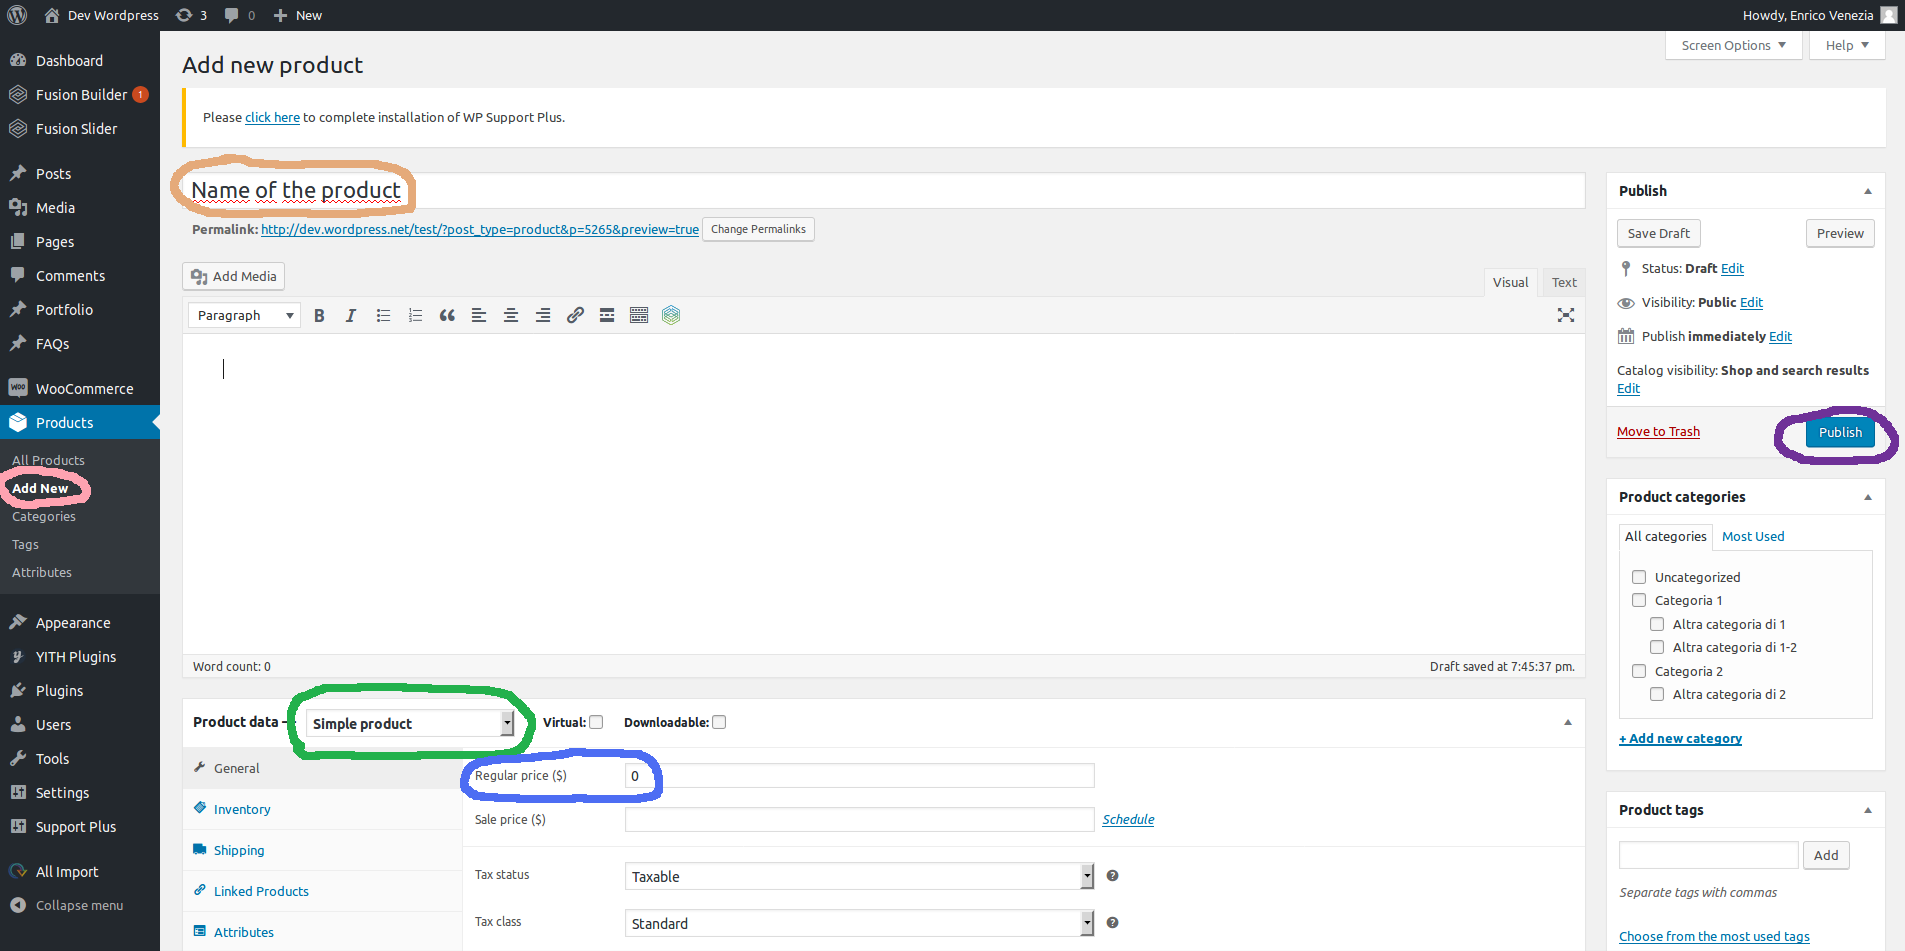
- Click on "Products > Add New" on the left Wordpress sidebar
- Insert the name of the Product and set the product mode as "Simple Product": The plugin will override the WooCommerce simple product features.
- Set a price in "Regular Price". Also putting "0" is fine. This is important otherwise, Your Spreadsheet Calculator can't attach its features to the product page.
- Save the product by clicking on "Publish"
After you've created the WooCommerce Product and after you've created your customer input/output fields (See How to create fields) you are now ready to create the calculator.
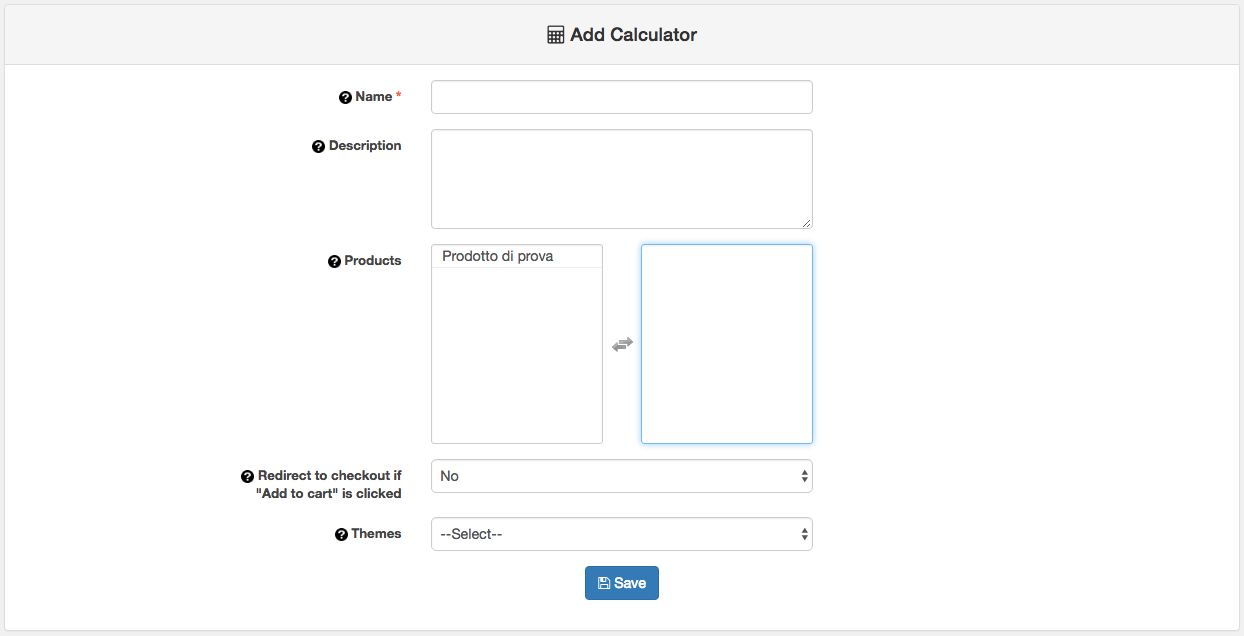
To create the calculator, go in the "Calculator" tab and click on "Write your formula" and fill in the following information about your new calculator:
- * Name: This value is only needed to remember what the calculator is for, and to find it in the list of calculators later.
- Description: A more detailed description of what the calculator does
- Input Fields: Click this to choose the fields that must be in the calculator. Click on the items that must be moved to the right (Selected fields). To remove items, click on the ones on the right to move them on the left.
- Formula: It's the heart of the calculator because it's where the calculation formula will be placed. In this slot it's possible to place:
- $aws_price_calc_n: Represents the value placed in the field by the visitor. This alias can be seen from the "Field" list.
- $price: It's the starting price for the product, set in WooCommerce, in the product's folder.
- a+b: Sum
- a-b: Subtraction
- a*b: Multiplication
- a/b: Division
- a^b: Power
- a!: Factorial
- a%b: Module
- sqrt(a): Square root
- cos(a): Cosine
- sin(a): Sine
- tan(a): Tangent
- sec(a): Secant
- csc(a): Cosecant
- cot(a): Cotangent
- abs(a): Absolute Value
The "Insert Field in the Formula" button can be used to add a field in the formula without typing it in.
- Products: The products that the calculator must be linked to. You can also assign the calculator to whole categories.
- Force to show price on errors: It try to show the price and output fields if there are some errors (ex: Required fields not filled in).
- Hide field errors on startup: On product page startup field errors are not shown.
- Redirect to checkout if "Add to cart" is clicked: If selected “Yes”, the visitor will be redirected to the checkout after adding the product to the cart. If selected "No", user can continue shopping and will not be redirected.
- Empty cart: If "Yes" it empties the cart when a product has been added to the cart. It's useful for services.
- Themes: The theme used to see the calculator. The default theme is auto-generated.
Click on "Save" and the calculator will be visible in the pages of the chosen products.

Price format and price approximation are made by WooCommerce (See WooCommerce > Settings > General tab)
1.8 - Creating a calculator from a spreadsheet file (PRO)
This module will help you in creating product’s price calculator by loading and using the calculation spreadsheet. The calculator uses the same formula described in the spreadsheet to calculate prices for products (with dynamic measurements).
The process contains two major steps.
- Creating WooCommerce Product
- Creating Your Spreadsheet Calculator (from spreadsheet)
Creating WooCommerce Product
First of all, you need to create your WooCommerce Product:
- Click on "Products > Add New" on the left Wordpress sidebar
- Insert the name of the Product and set the product mode as "Simple Product": The plugin will override the WooCommerce simple product features.
- Set a price in "Regular Price". Also putting "0" is fine. This is important otherwise, Your Spreadsheet Calculator can't attach its features to the product page.
- Save the product by clicking on "Publish"
After you've created the WooCommerce Product and after you've created your customer input/output fields (See How to create fields) you are now ready to create the calculator.
Creating Your Spreadsheet Calculator
To create the calculator, go in the "Calculator" tab and click on "Upload your worksheet":
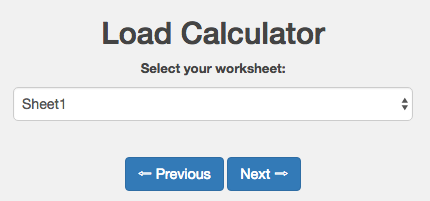
- Find the calculation sheet using the "Browse" function, select it and click on "Upload"

- Choose the desired sheet from the list and click on "Next"
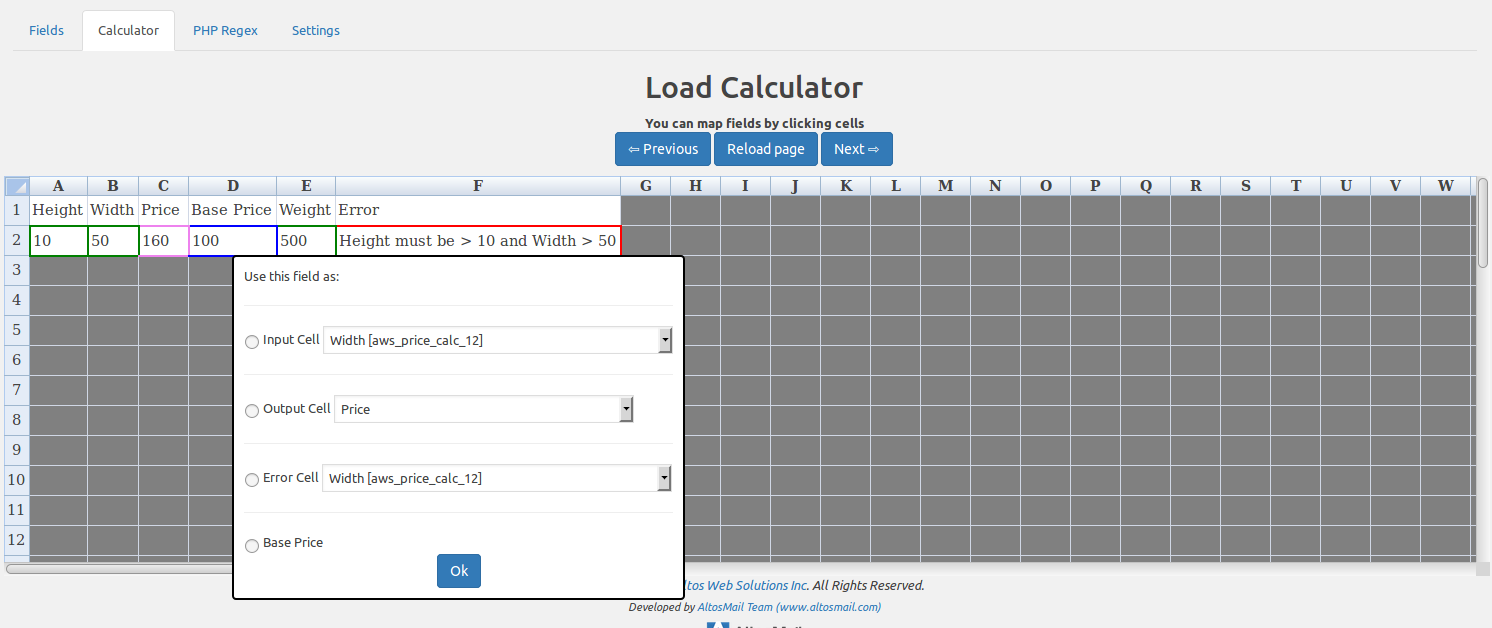
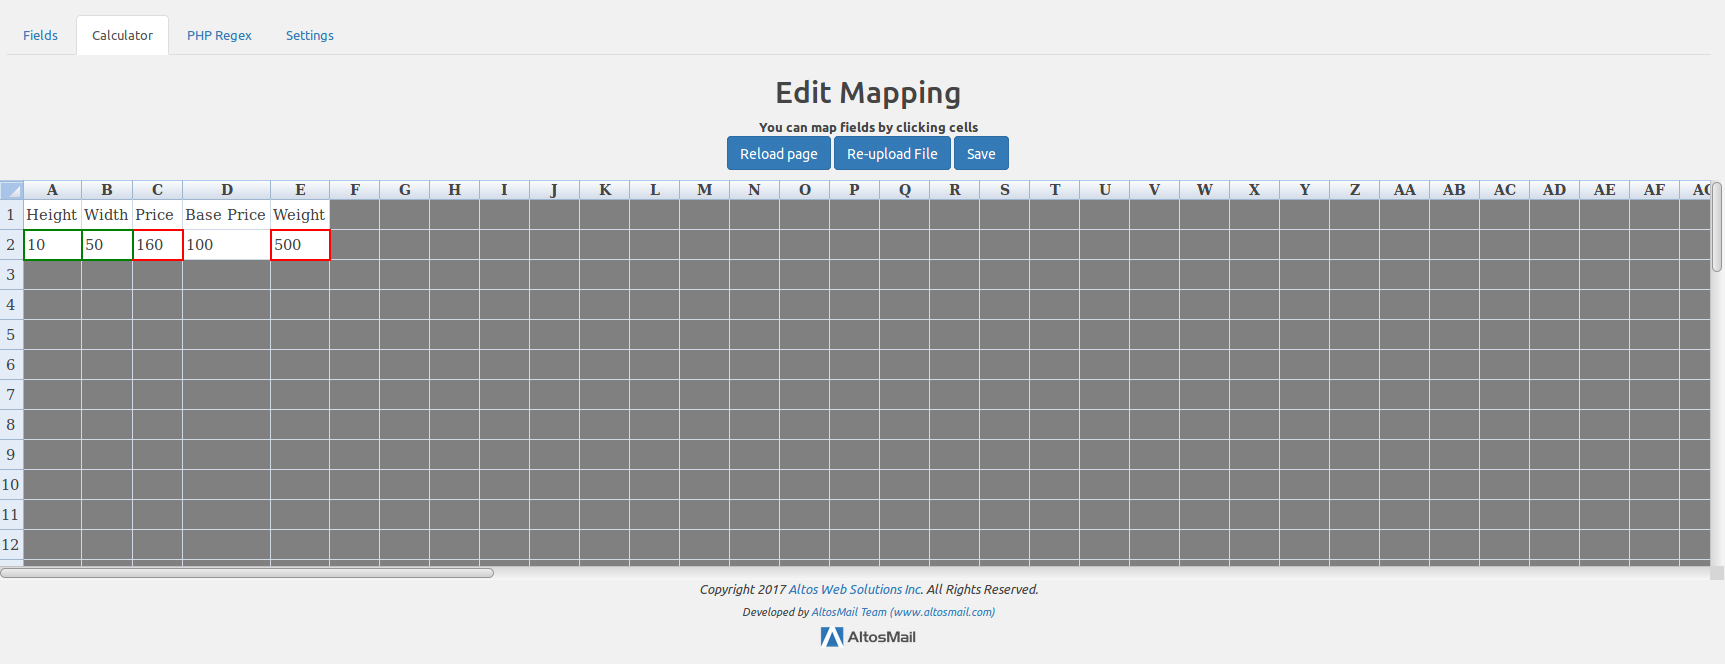
- From this screen(shown below) the cells in the sheet can be mapped to the ones in the calculator.
- Input Cell: the fields that will be used by the visitors to insert the data
- Output Cell: holds the formulas which will show the output values. You're required to map the Price field because it's the default field. If the output spreadsheet cell contains a numeric value, a formatted numeric value will be displayed to the visitor (by following the rules of the field). If the output spreadsheet cell contains a string value, a text will be displayed to the visitor.
- Base Price: Your Spreadsheet Calculator will get this value from your WooCommerce Product "Regular Price"
- Error Cell: This let you validate your input calculator data by using Excel formulas or check if your Excel spreadsheet contains errors. You can map more Error Cells for the same Input Field. If the cell is not empty an error will be shown in the product calculator. "IFERROR" and "ISERROR" are supported formulas to check if a cell has an Excel error (For example #DIV/0).
- Tax Rate: Your Spreadsheet Calculator will get this value from your WooCommerce Taxes (WooCommerce Settings > Tax). You need to use the Tax Rate cell as part of a formula inside another cell in your Excel file, example:

- A2 is a cell with a fixed value
- B2 is a cell with a starting fixed value. This value will be then changed by Your Spreadsheet Calculator once you mapped the field with "Tax Rate"
- C2 is a cell with a formula =A2+(A2*B2)/100. The formula used to calculate the final price VAT included.
- SKU: Starting from version 2.3.5 on Your Spreadsheet Calculator it is possible to export the SKU value of the landed product on the Excel spreadsheet. This let you create different logic on different products using only one excel sheet. The SKU is located in the WooCommerce Product Page:
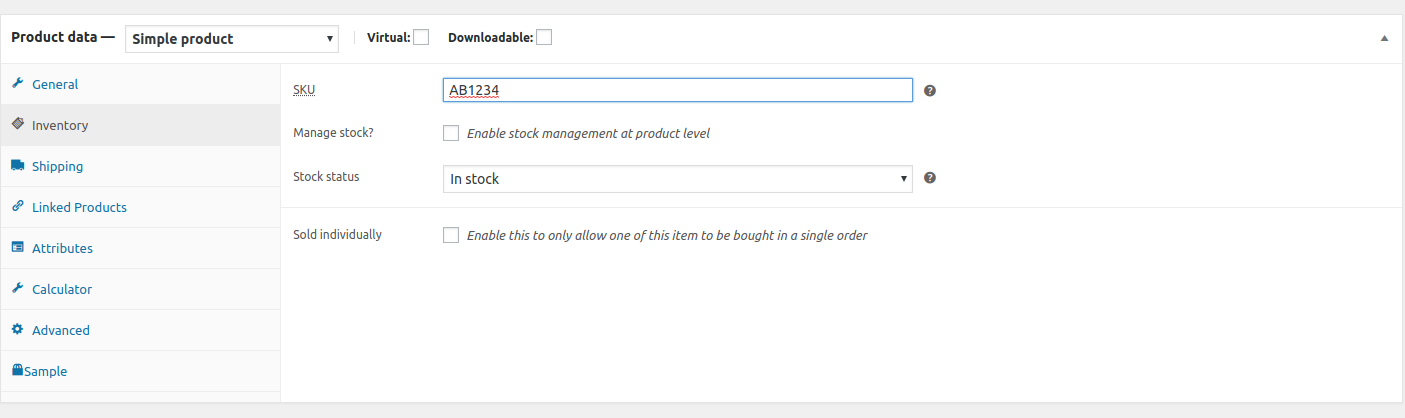
You can change this value any time and this change will be reflected to the Excel spreadsheet logic too.
Once all the fields have been mapped, click on "Next".
- The required information for the calculator will be displayed:
- * Name: This value is only needed to remember what the calculator is for, and to find it in the list of calculators
- Description: A more detailed description of what the calculator does
- Input fields: Show or hide the input fields you want. To show move the item to right. To hide, move the item to left. You can drag&drop the fields on the right to change fields' order.
- Output fields: Show or hide the output fields you want. To show move to the right, to hide move the item to the left. You can drag&drop the fields on the right to change fields order.
- Overwrite Quantity: You can overwrite the default quantity field of WooCommerce: WooCommerce quantity field will be hide, instead your selected field will be used as quantity field. WooCommerce Inventory Managment is also supported.
- Overwrite WooCommerce Weight: You can overwrite the default weight of the WooCommerce product by setting an output field. In this way, the weight will be calculated by using the spreadsheet formula.
- Overwrite WooCommerce Length: You can overwrite the default length of the WooCommerce product by setting an output field. In this way, the length will be calculated by using the spreadsheet formula.
- Overwrite WooCommerce Width: You can overwrite the default width of the WooCommerce product by setting an output field. In this way, the width will be calculated by using the spreadsheet formula.
- Overwrite WooCommerce Height: You can overwrite the default height of the WooCommerce product by setting an output field. In this way, the height will be calculated by using the spreadsheet formula.
- Products: The products that the calculator must be linked to; you can assign the calculator to whole categories. (Note: Starting from Your Spreadsheet Calculator 2.3.6 you can select the calculator directly inside from your WooCommerce Product: Go to the product you want to assign the calculator and click on the "Calculator" tab; select the calculator from the list and click on "Attach calculator").
- Force to show price on errors: It try to show the price and output fields if there are some errors (ex: Required fields not filled in).
- Hide field errors on startup: On product page startup field errors are not shown.
- Redirect to checkout if "Add to cart" is clicked: The visitor will be redirected to the checkout after adding the product to the cart if “Yes”. The visitor will not be redirected and will continue shopping if “No”.
- Empty cart: If "Yes" it empties the cart when a product has been added to the cart. It's useful for services.
- Themes: The theme used to see the calculator
To modify the mapping of the calculator, click on "Edit Mapping" in the calculator list. To edit the other information click on "Edit".
Price format and price approximation are made by WooCommerce (See WooCommerce > Settings > General tab)
Notes:
- Your Spreadsheet Calculator allows to upload Microsoft Excel, LibreOffice, OpenOffice spreadsheet files.
1.8.1 - Reload or Edit spreadsheet calculator
To reload or edit a calculator without deleting/creating a new one follow these steps:
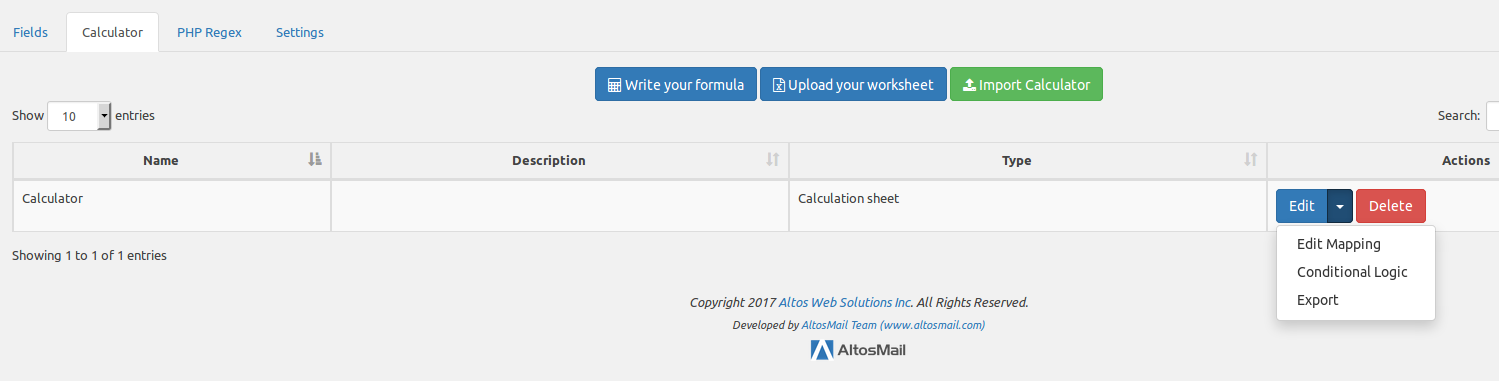
-
From your Your Spreadsheet Calculators' list, click on the right of the Edit button and then click on "Edit Mapping"
-
Here you can edit the fields mapping. If you want to reload your calculator click on "Re-upload File" and follow the same steps you have already done to make a new calculator
- Click on "Save" button
1.8.2 - Download Spreadsheet
This feature was introduced starting from version: 2.2.0
You can download the spreadsheet file you've previously uploaded to create your calculator in Your Spreadsheet Calculator. You can use the downloaded spreadsheet for:
- Editing some fields or formula and upload again.
- Using the same spreadsheet in some other calculator or website.
To download your spreadsheet file follow these steps:
- Click on the "Calculator" tab of the plugin
- Click on the drop-down "Edit" button of your calculator
- From the drop-down click on "Download Spreadsheet
- You can now save your file
1.8.3 - Export Calculator
This feature was introduced starting from version: 2.2.0
You can Export a Your Spreadsheet Calculator calculator as a ZIP file to import it into another environment. When you export a calculator some of these related elements are included:
- Fields
- Calculator
- Themes
But WooCommerce products and WooCommerce product categories are not included in the export.
To export a calculator please follow the steps mentioned below:
- Click on “Calculator” tab
- Click on the drop-down button of the calculator you want to export, then click on “Export”
By this way, you can download the calculator in ZIP format.
1.8.4 - Import Calculator
This feature was introduced starting from version: 2.2.0
You can import a calculator that you've previously downloaded with Your Spreadsheet Calculator (See Export Calculator).
"The Import of the Calculator" follow these rules:
- If a field with same settings exists, the calculator field will be mapped with the existing one, otherwise, a new field will be created and mapped to it.
- If a theme with same content exists, the calculator theme will be mapped with the existent one, otherwise a new theme will be created and mapped to it. The new theme name will be: “ThemeName_Date_Time.php”. Where “Date” and “Time” are the date and time of the current import respectively.
- A new calculator will always be created.
To import a calculator please follow these steps:
- Click on the “Calculator” tab
- Click on “Import Calculator” button
- Click on the “Browse” button to select the ZIP file you want to import.
- Click on “Import”
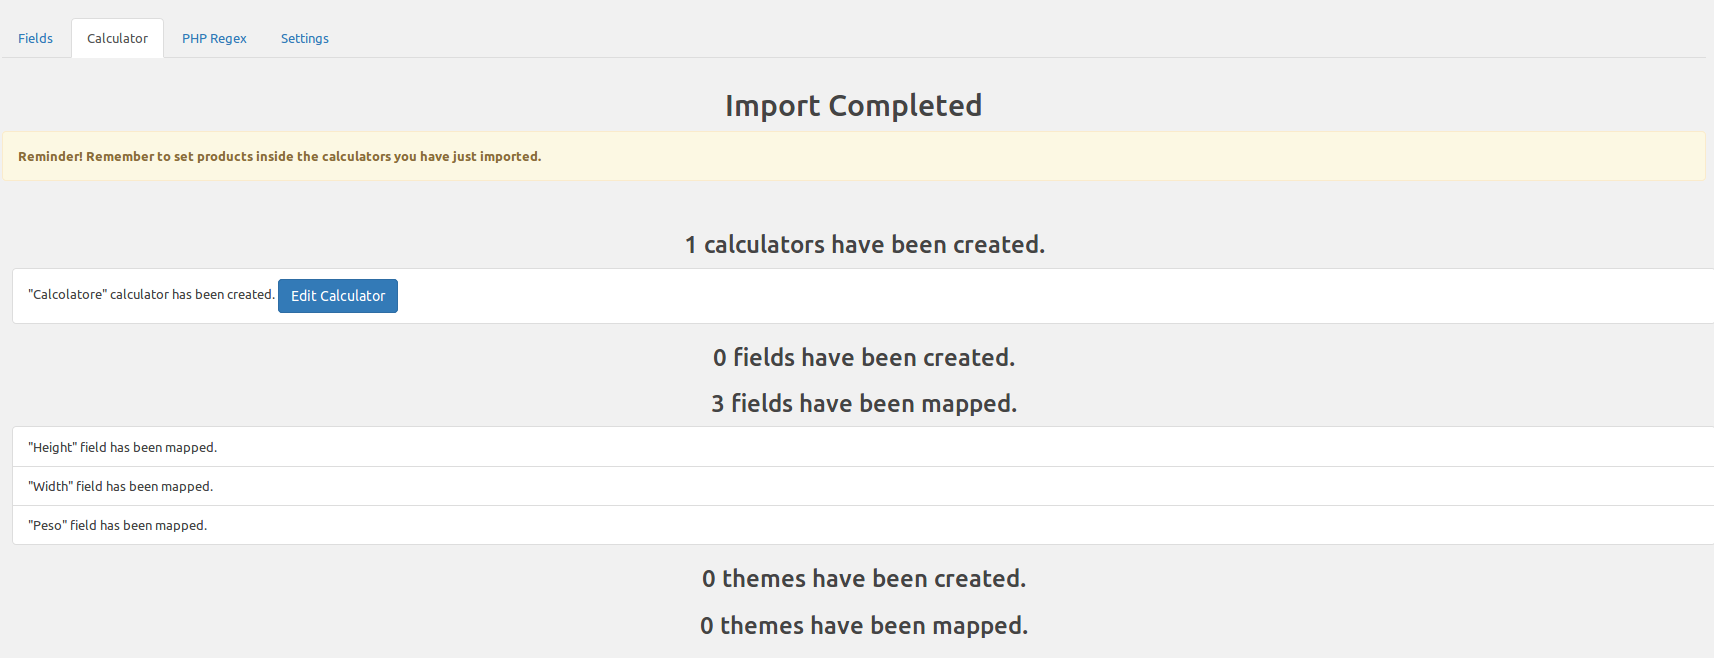
- The information page is shown when the import is finished. This page contains information about the fields created (or mapped) as well as themes created (or mapped).
- Click on “Edit Calculator” and select the products/product categories which you want to display in the imported calculator.
1.9 - The price doesn't change!
If you notice that the price doesn't change in real-time on your product page, it could be a problem related to your Wordpress theme and/or our Your Spreadsheet Calculator plugin.
Starting from version 2.2.0 this problem can be resolved in two ways:
- If you know how Browser Inspector works, you can follow the instructions in the video below, otherwise...
- Send an email to us by using the form here with the subject "Price doesn't change" and attach your WP-admin credentials (Your website URL, Username and Password) that are essentials to solve the problem and we’ll be happy to get you out of this trouble.
This video explains how to solve the problem using the Browser Inspector:
1.10 - Conditional Logic
Through this, you can show or hide Your Spreadsheet Calculator fields based on the other field values. If you want to enable the conditional logic:
- Create the fields you need in your calculator (instructions here)
- Create your Excel calculator (instructions here) or your Formula Calculator (instructions here)
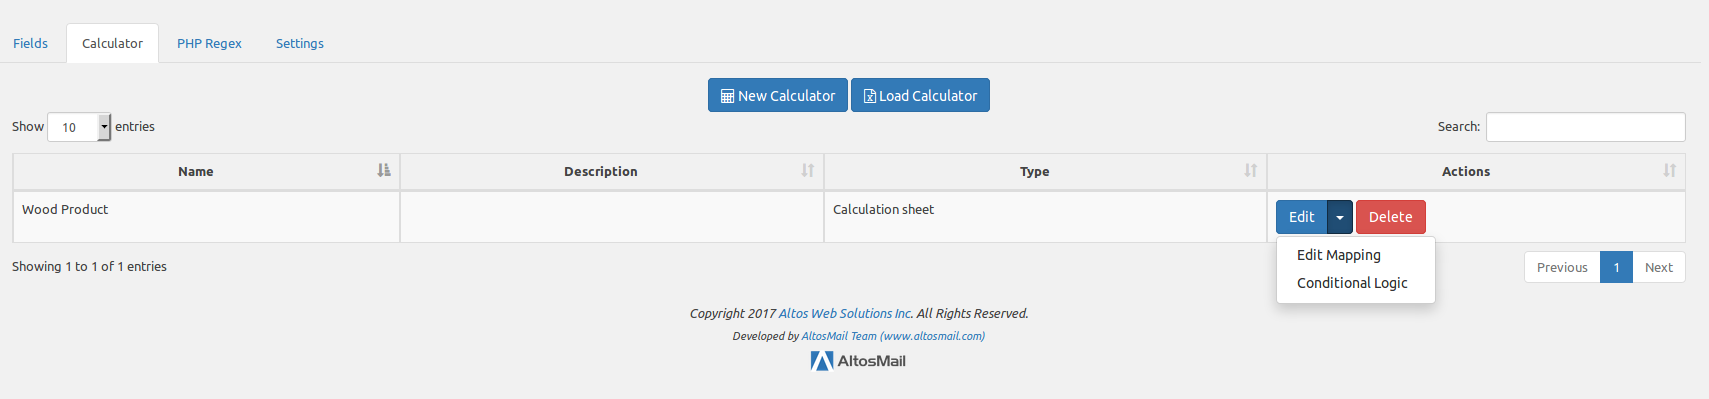
-
Click on the drop-down button of your Your Spreadsheet Calculator:
- Click on the “Conditional logic” button:
- Enabled: If you want to enable the conditional logic, set it to “Yes”
- Show or Hide fields: In the left box, add the fields you want to show on the product page. In the right box, add the fields that you want to hide on the product page.
- Rules: Select the field you want to show/hide by clicking on “Edit”. In the modal box you can insert the rules that defined the behavior: If the field is shown/hidden and the rule is met, the field will be hidden/shown respectively. You can create complex rules by using this system.

Conditional logic will set "0" on mapped cells when input fields are hidden. This means you need to provide your Excel file a formula to manage it.
Notes:
Starting from Your Spreadsheet Calculator 2.3.6 Conditional Logic supports Output Fields as well. You can now hide/show Output Fields based on the values of Input Fields or you can also hide/show Input Fields based on Output Fields. You can use the same instructions as above to use Output Fields in Conditional Logic.
Video Example: How to use Conditional Logic
1.11 - View the order data
You can check the data that the visitor used to buy your product within the WooCommerce Order.
Click on "WooCommerce > Orders" and select the desired order. In the box "Price Simulator: Order Simulation" the details of the calculation can be seen:

This data is also recorded in the WooCommerce Order itself, so you can use data in other plugins (Such as a plugin to print the order in PDF format):

1.12 - Edit the CSS style (custom.css)
You can edit the CSS style of Your Spreadsheet Calculators that are shown in the front-end, and even the general style, by clicking on "Settings", editing the "Custom CSS" field:
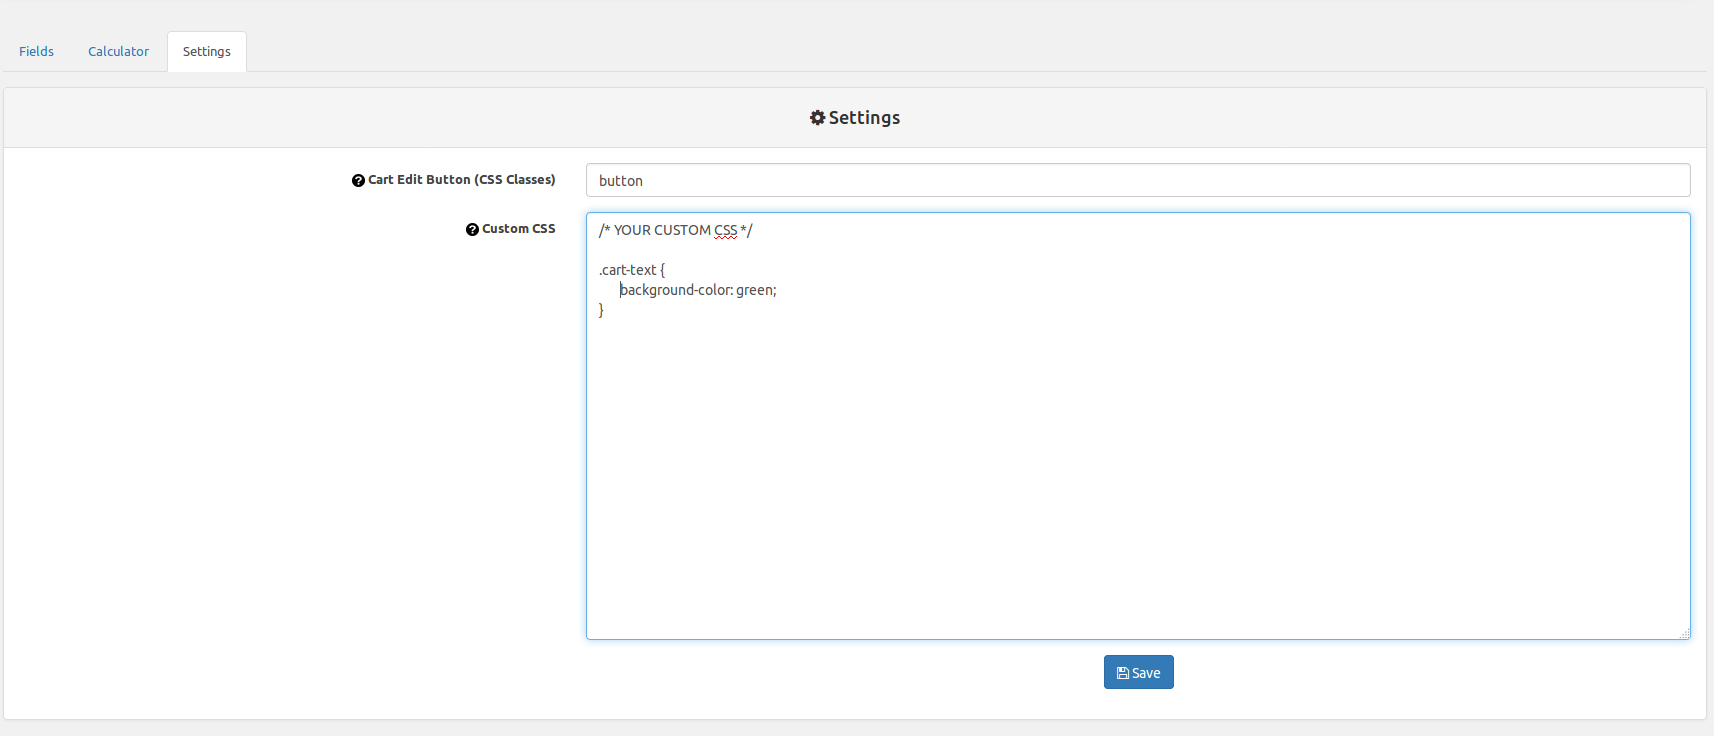
or accessing by FTP to the file: /wp-content/uploads/excel-worksheet-price-calculation/style/custom.css
Here you can override or add CSS classes.
1.13 - Using themes
Themes, which are only available in the Your Spreadsheet Calculator paid (PRO) version, allow you to customize the graphics look of the calculator, using HTML/CSS coding.
Available themes are either made by using Bootstrap and Uikit or without using any frameworks.
Example themes are located in: "/wp-content/plugins/excel-worksheet-price-calculation/admin/resources/themes"
Available themes are:
- example.php: It's a simple example, just iterate through all fields and print them
- example_bootstrap.php: How to use Bootstrap. Bootstrap is autoloaded with Your Spreadsheet Calculator
- example_custom.php: It's a more advanced custom theme, you can edit every field aspect
- example_uikit.php: How to use UIkit. Uikit is autoloaded with Your Spreadsheet Calculator
If you want to use an example just copy the file you want through FTP from the folder: "/wp-content/plugins/excel-worksheet-price-calculation/admin/resources/themes" to “/wp-content/uploads/excel-worksheet-price-calculation/themes"
If you want a new theme from scratch, create a new file in: “/wp-content/uploads/excel-worksheet-price-calculation/themes”
like "your_theme.php". A theme is set up like this:
<?php

/* THEME_NAME: Your Theme Name */

?>
<h2>This is a template example</h2>
<div class="wpc-product-form">
<div class="awspc-output-product">
<?php foreach($this->view['outputResults'] as $outputFieldId => $outputResult): ?>
<div class="awspc-output-result-row <?php echo $outputResult['fieldName']; ?>" style="<?php echo (count($this->view['errors']) != 0)?"display:none":"" ?>">
<span class="awspc-output-result-label"><b><?php echo $outputResult['field']->label; ?></b>: </span>
<span class="awspc-output-result-value"><?php echo $outputResult['value']; ?></span>
</div>
<?php endforeach; ?>
</div>
<table>
<?php foreach($this->view['data'] as $key => $data): ?>
<tr class="awspc-field-row" data-field-id="<?php echo $data['field']->id; ?>"
style="<?php echo ($this->view['conditionalLogic'][$data['field']->id] == true)?"":"display:none"; ?>">
<td id="<?php echo $data['labelId']; ?>">
<?php echo $this->userTrans($data['field']->label); ?>
</td>
<td id="<?php echo $data['inputId']; ?>">
<?php echo $data['widget']; ?>
</td>
</tr>
<?php endforeach; ?>
</table>
</div>
In "Your Theme Name" type a name because this will be used to identify the theme in the backend of Wordpress (Themes field in your calculator settings).
You can iterate through the calculator fields as follow:
<?php foreach($this->view['data'] as $key => $data): ?>
//Your code here
<?php endforeach; ?>
If you want to print the field label:
<?php echo $data['field']->label; ?>
To translate the field labels or other things as described in the "Translations" chapter:
<?php echo $this->userTrans("language_key"); ?>
You can draw the whole field using:
<?php echo $data['widget']; ?>
You can draw the default autogenerated calculator view. This is useful if you don't want to redraw it:
<?php echo $this->view['defaultView']; ?>
You can check if the field should be displayed by the conditional logic:
if($this->view['conditionalLogic'][$data['field']->id] == true){
//Display the field
}else{
//Hide the field
}
1.13.1 - Advance Field Customization
In Your Spreadsheet Calculator it's possible to render every single component of a field by reading the "$this->view['fields']" object. Properties are as follow:
<?phpWhere:
echo $this->view['fields']['aws_price_calc_n']['id'];
echo $this->view['fields']['aws_price_calc_n']['label_id'];
echo $this->view['fields']['aws_price_calc_n']['label_name'];
echo $this->view['fields']['aws_price_calc_n']['field_id'];
echo $this->view['fields']['aws_price_calc_n']['type'];
echo $this->view['fields']['aws_price_calc_n']['class'];
echo $this->view['fields']['aws_price_calc_n']['html'];
echo $this->view['fields']['aws_price_calc_n']['value'];
?>
- aws_price_calc_n: Replace it with the name of the field, which you would like to get the properties of.
- id: Numeric ID of the field
- label_id: Unique ID of the field label
- field_id: Alphanumeric ID of the field
- type: Type of field
- class: CSS class applied to the field
- html: HTML rendering of the field
- value: Value of the field
Here is an example of how to render every field component (Every field must exist):
<?php
/*
* THEME_NAME: Example of Advanced Field Customization
*/
?>
<div class="awspc-product-form">
<!--Field start-->
<div data-id="<?php echo $this->view['data']['aws_price_calc_1']['elementId']; ?>" class="form-group awspc-field-widget">
<div class="awspc-field <?php echo $this->view['data']['aws_price_calc_1']['class']; ?>">
<?php echo $this->view['fields']['aws_price_calc_1']['html']; ?>
<label for="<?php echo $this->view['data']['aws_price_calc_1']['elementId']; ?>_field">
<?php echo $this->view['fields']['aws_price_calc_1']['label_name']; ?>
</label>
</div>
<div class="awspc-field-error"></div>
</div>
<!--Field end-->
<!--Field start-->
<div data-id="<?php echo $this->view['data']['aws_price_calc_2']['elementId']; ?>" class="form-group awspc-field-widget">
<div class="awspc-field <?php echo $this->view['data']['aws_price_calc_2']['class']; ?>">
<?php echo $this->view['fields']['aws_price_calc_2']['html']; ?>
<label for="<?php echo $this->view['data']['aws_price_calc_2']['elementId']; ?>_field">
<?php echo $this->view['fields']['aws_price_calc_2']['label_name']; ?>
</label>
</div>
<div class="awspc-field-error"></div>
</div>
<!--Field end-->
<!--Field start-->
<div data-id="<?php echo $this->view['data']['aws_price_calc_3']['elementId']; ?>" class="form-group awspc-field-widget">
<div class="awspc-field <?php echo $this->view['data']['aws_price_calc_3']['class']; ?>">
<?php echo $this->view['fields']['aws_price_calc_3']['html']; ?>
<label for="<?php echo $this->view['data']['aws_price_calc_3']['elementId']; ?>_field">
<?php echo $this->view['fields']['aws_price_calc_3']['label_name']; ?>
</label>
</div>
<div class="awspc-field-error"></div>
</div>
<!--Field end-->
</div>
1.14 - Regex Validation
Regex (or regular expression) is a way to check if the user's input is correct. Regex is a language, and you can use PHP Regex with our Your Spreadsheet Calculator Plugin (PCRE, click here for more details).
For example, if you want to restrict your user to type only letters in some input fields:
- Click on "PHP Regex"
- Click on "New Regex (PHP)"
- Add a "Name *" for your regex, for example, "Only letters" and write a Regex in the "Regex (PHP)" field, for example: "/^[a-zA-Z]$/" and click on "Save"
- Go to the field on which you want to apply the regex rule, it must be a "Text" field
- You can write the regex rule directly in the "Validation Regex Rule" field or load it from the library by clicking on the cloud icon.
- Write an error message in the "Regex Error Message" field which you want to show in case the regex rule conditions are not met.

As a result:
- If you try to put a number in your website product, you'll get an error message.
- If you try to put only letters, no errors will be shown and the product can be added to the cart successfully after the calculation of price on the backend.

1.15 - Translations
15.1 - Frontend Translation
You can translate product fields, labels, drop-down items and fields.
To translate a language just create or edit a file (e.g: "en_US.php", "fr_FR.php", "it_IT.php") in: “/wp-content/uploads/excel-worksheet-price-calculation/translations”
You'll find an existing example like below:
<?php
return array(
'label1' => 'label1_EN',
'label2' => 'label2_EN',
'item1' => 'item1_EN',
'item2' => 'item2_EN',
);
For example "en_US.php":
<?php
return array(
'height' => 'Height',
'width' => 'Width',
);
For example "it_IT.php":
<?php
return array(
'height' => 'Altezza',
'width' => 'Larghezza',
);
You can also translate text on the website front-end, for example the Edit Cart Button, the text regarding a Not set field, see the table below:
| Translate Key | Default Value (en_US) | Description | Keywords |
|---|---|---|---|
| element.not_set | Not set | The text displayed when a field is empty in Cart, Checkout and Order Details | None |
| wpc.cart.edit | Edit | Text of the edit button in the cart | None |
| wpc.cart.price | Price | Price label displayed on the edit modal in the cart | None |
| wpc.cart.cancel | Cancel | Label of the "Cancel" button on the edit modal in the cart | None |
| wpc.cart.modal.title | Edit of %product_title% | Label displayed on top of the edit modal in the cart | %product_title% = The name of the product |
| ecommerce.shop.choose_an_option | Choose an option | Shop button label used to redirect the user to the product page | None |
15.2 - Backend Translation
To translate the Your Spreadsheet Calculator backend you can copy the file located at “/wp-content/plugins/excel-worksheet-price-calculation/admin/awspricecalculator/Language/en_US.php” and create a new language file in the same folder (ex: "fr_FR.php", "it_IT.php", "de_DE.php").
You need to open the PHP file and edit the labels. The backend file format is the same as the frontend file format.
Important Note: For the backend translations, if you upgrade your Your Spreadsheet Calculator version you will lose the edits so please make a backup copy or you can send us your translation file here so we can add it for next updates.
1.16 - Wordpress Hooks
If you are a PHP programmer you can make more advanced things with Wordpress Hooks.
- See how to Change the price
- See how to Enable/Disable price Formatting
- See how to Check Errors
- See how to Hide Calculator Form
1.16.1 - Change the price
You can manipulate the final price of Your Spreadsheet Calculator by using our custom function. Have a look at these examples below:
You can write it in your Wordpress theme functions.php:
/* For Your Spreadsheet Calculator >= 2.3.0
*	$price						The price
*	$params['errors']			List of errors
*	$params['priceRaw'] 		The price (No formatting)
*	$params['product']			The product data
*	$params['calculator']		The calculator
*	$params['data']				Raw user data
*	$params['userData']			Transformed user data
*	$params['outputResults']	Calculated output fields
*	$params['formatPrice']		Should the price be formatted?
*/
function custom_awspc_filter_calculate_price($price, $params){
$price = $price*5;
return $price;
}
add_filter('awspc_filter_calculate_price', 'custom_awspc_filter_calculate_price', 10, 2);
/* For Your Spreadsheet Calculator < 2.3.0 (Deprecated)
*	$price						The price
*	$product_id					The product ID
*	$calculator_id				The calculator ID
*	$data						Input values
*/
function cmw_custom_price($price, $product_id, $calculator_id, $data){
$price = $price*5;
return $price;
}
add_filter('woo_price_calculator_calculate_price', 'cmw_custom_price', 10, 4);
add_filter is a core function of Wordpress, click here if you want more details.
If you want to change only the AJAX response use:
/* For Your Spreadsheet Calculator >= 2.3.0
*	$response['errorsCount']		Number of field errors
*	$response['errors']				List of field errors
*	$response['price']				The formatted price
*	$response['priceRaw']			Raw price
*	$response['outputFields']		List of the output fields
*	$response['conditionalLogic']	The conditional logic
*	$params['productId']			The product ID
*	$params['calculator']			The calculator
*	$params['fields']				The fields
*	$params['postData']				User data (No transformation)
*	$params['conditionalLogic']		The conditional logic
*	$params['outputResults']		The output results
*	$params['errors']				List of field errors
*	$params['price']				The formatted price
*	$params['priceRaw']				Raw price
*/
function custom_awspc_filter_calculate_price_ajax_response($response, $params){
return $response;
}
add_filter('awspc_filter_calculate_price_ajax_response', 'custom_awspc_filter_calculate_price_ajax_response', 10, 2);
If you want to change the product price in cart page (for example to add different type of taxes, surcharges, or create discounts) for the current product in the cart:
/* For Your Spreadsheet Calculator >= 2.4.0
*	$productPrice			The current calculated product price.
*	$fieldsData				The data for each calculator field (Use: printf($fieldsData); to see the content)
*	$outputFields			The data for each output calculator field (Use: printf($outputFields); too see the content)
*/
function custom_awspc_filter_calculate_price_in_cart($productPrice, $fieldsData, $outputFields){
$newProductPrice	= $productPrice + 100;
return $newProductPrice;
}
add_filter('awspc_filter_calculate_price_in_cart', 'custom_awspc_filter_calculate_price_in_cart', 10, 3);
1.16.2 - Enable/Disable price Formatting
You can also enable or disable the Price Formatting in Your Spreadsheet Calculator. This could be useful if you need to get the raw price (Without currency for example).
Return true if you want to enable price formatting, false otherwise.
add_filter('woo_price_calculator_format_price', 'cmw_format_price', 10, 5);
function cmw_format_price($format_price, $price, $product_id, $calculator_id, $data){
return true; //or false
}
1.16.4 - Advanced Validation Rules
You can use two different ways to check field errors using PHP (For example you can add validation to check if Field1 < 100 and Field2 < 100)
- Using WooCommerce Hooks, please read the article here
- Using WPC Hook (Described in this article)
This example code will work for Your Spreadsheet Calculator >= 2.3.0.
You can add this code by installing Code Snippets Plugin
function custom_awspc_filter_calculate_price_errors($errors, $params){
$calculator	= $params['calculator'];
$userData		= $params['userData'];
/* Applying rule to calculator with ID 6 (Get the ID from the Edit page of the calculator in the URL bar) */
if($calculator->id == 6){
/* Check if Field 1 > 100 && Field 2 > 100 */
if($userData['aws_price_calc_1'] > 100 && $userData['aws_price_calc_2'] > 100){
/* Display the error */
$errorMessage					= "Field1 must be < 100 and Field2 must be < 100";
$errors['aws_price_calc_1'][]	= $errorMessage;
$errors['aws_price_calc_2'][]	= $errorMessage;
}
}
return $errors;
}
add_filter("awspc_filter_calculate_price_errors", "custom_awspc_filter_calculate_price_errors", 10, 2);
$params is a PHP array with the following:
- $params['priceRaw']: The result price without formatting
- $params['product']: The product
- $params['calculator']: The calculator
- $params['data']: The user data (Some values could contain ID instead of real user values)
- $params['userData']: The user data without any transformation
- $params['outputResults']: The output fields
1.16.5 - Hide Calculator Form
If you want to show or hide the default calculator form, use awspc_filter_display_calculator
Example:
function custom_awspc_filter_display_calculator($calculatorId, $productId){
return false; //false = hide the form, true = show the form
}
add_filter('awspc_filter_display_calculator', 'custom_awspc_filter_display_calculator', 10, 2);
1.17 - jQuery Triggers
It's possible to create custom jQuery functions to extend Your Spreadsheet Calculator features. If you need to add custom Javascript to your website you could install this plugin.
- awspcBeforeCalculatePrice: This function is called before the price calculation.
- awspcAfterCalculatePrice: This function is called after the price calculation.
- awspcAjaxCalculatePrice [Your Spreadsheet Calculator >= 2.3.0]: This function is called before the Ajax request is sent
- awspcAjaxCalculatePriceSuccess [Your Spreadsheet Calculator >= 2.3.0]: This function is called after the Ajax request is sent (Request success)
- awspcBeforeProductCalculatePrice [Your Spreadsheet Calculator >= 2.3.0]: The same as "awspcBeforeCalculatePrice", but executed only on Product Page.
- awspcAfterProductCalculatePrice [Your Spreadsheet Calculator >= 2.3.0]: The same as "awspcAfterCalculatePrice" but executed only on Product Page.
Working examples:
Trigger "awspcBeforeCalculatePrice"
jQuery(document).bind("awspcBeforeCalculatePrice", function(ev){
alert("Message before price calculation");
});
Trigger "awspcAfterCalculatePrice"
jQuery(document).bind("awspcAfterCalculatePrice", function(ev){
alert("Message after price calculation");
});
Trigger "awspcAjaxCalculatePrice"
jQuery(document).bind("awspcAjaxCalculatePrice", function(ev){
alert("Message before ajax request is sent");
});
Trigger "awspcAjaxCalculatePriceSuccess"
Using this function is possible to retrive request parameters:
- result.price: The calculated price
- result.erros: List of fields errors
- result.errorsCount: Number of fields with errors
- result.outputFields: Output fields
- result.conditionalLogic: Calculated Conditional Logic
jQuery(document).bind("awspcAjaxCalculatePriceSuccess", function(ev, args){
alert("Message after ajax request is sent (success), fields with error: " + args.result.errorsCount);
});
© Copyright 2024 - YourPlugins.com | VAT: IT10996290960